For quite some time, I have been pondering over the idea of creating a web app using AngularJS, Python & MongoDB. Recently, I had the opportunity of creating a Remote Script Execution Manager web app with MongoDB web server. In this tutorial, I’ll show how to create a full web which would have the functionality to add remote machine details and execute scripts on the remote machine on click of a button from the web application itself.
The tutorial requires the reader to have basic knowledge of Python and AngularJS. Python web application development using Flask and MySQL should be good starting point to learn Python Flask programming.
Source code from this tutorial is available on GitHub.
Getting Started
Before getting started, make sure you have Python 2.7 installed in your system. Install Flask using PIP python package manager.
pip install flask
Also make sure you have MongoDb installed and running in your linux box. Type in the following command to check the mongodb status:
service mongodb status
Creating Python Flask web App
Create a project folder called PythonFlaskApp. Inside the project folder create a file called app.py. Import flask and create a default / route for the application. In the default route we’ll display the list of machines added in our web application. Here is how it looks like:
from flask import Flask,render_template

@application.route('/')
def showMachineList():
    return render_template('list.html')

if __name__ == "__main__":
    application.run(host='0.0.0.0')
We’ll make use of bootstrap to design our web pages, so download and include bootstrap js and css files in the static folder inside the project directory. You can refer the project in GitHub in case of any confusion.
Add a folder called templates inside the project directory which would contain static template files which we would render. So, inside the templates folder create a file called list.html. Here is how it looks like:
<!DOCTYPE html>
<html lang="en">
<head>
<meta charset="utf-8">
<meta http-equiv="X-UA-Compatible" content="IE=edge">
<meta name="viewport" content="width=device-width, initial-scale=1">
<meta name="description" content="">
<meta name="author" content="">
<link rel="icon" href="../../favicon.ico">
<title>Code Handbook</title>
<link href="static/css/bootstrap.min.css" rel="stylesheet">
<link href="static/css/jumbotron-narrow.css" rel="stylesheet">
<script src="static/js/angular.js"></script>
</head>
<body>
<div class="container">
<div class="header clearfix">
<nav>
<ul class="nav nav-pills pull-right">
<li role="presentation" class="active"><a href="#" data-toggle="modal">Add</a></li>
</ul>
</nav>
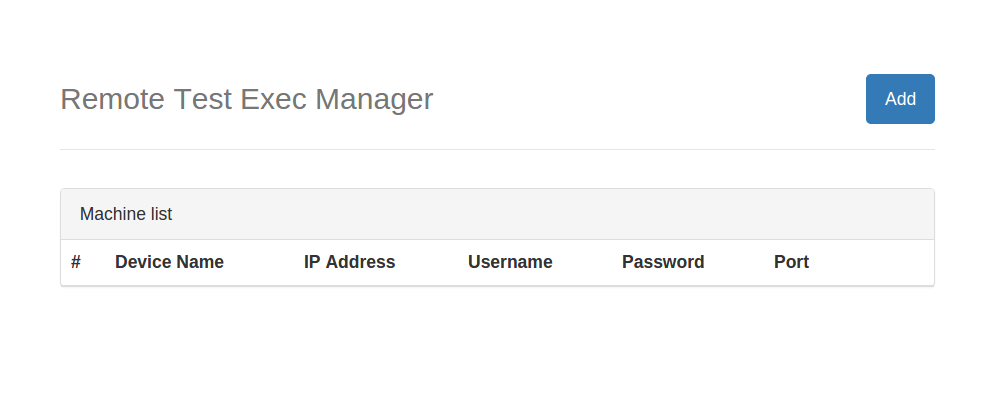
<h3 class="text-muted">Remote Test Exec Manager</h3>
</div>
<div class="bs-example" data-example-id="panel-without-body-with-table">
<div class="panel panel-default">
<div class="panel-heading">Machine list</div>
<table class="table">
<thead>
<tr>
<th>#</th>
<th>Device Name</th>
<th>IP Address</th>
<th>Username</th>
<th>Password</th>
<th>Port</th>
<th></th>
<th></th>
<th></th>
</tr>
</thead>
<tbody>
<tr>
<th></th>
<td></td>
<td></td>
<td></td>
<td></td>
<td></td>
<td><span style="cursor:pointer;" class="glyphicon glyphicon-pencil" aria-hidden="true"></span></td>
<td><span style="cursor:pointer;color:#e43309;" class="glyphicon glyphicon-remove" aria-hidden="true"></span></td>
<td><span style="cursor:pointer;color:#3c763d;" class="glyphicon glyphicon-play" aria-hidden="true"></span></td>
</tr>
</tbody>
</table>
</div>
</div>
</div>
<script src="static/js/jquery.min.js"></script>
<script src="static/js/bootstrap.min.js"></script>
</body>
</html>
Save the changes and run the server using python app.py and you should have you app running on http://localhost:5000/
Inserting Data to MongoDb from Python Flask Using AngularJS
We’ll make use of AngularJS to handle the client side script for our web application. Download and include AngularJS in the list.html
page. Add the ngApp and ngController directives to the list.html page. Now the page is ready for AngularJs.
Right now we have a listing page with a Add button. On clicking the add button we’ll show a pop to insert machine
details to the MongoDb. So, add the following add popup HTML code to the list.html page.
<div class="modal fade" id="addPopUp" tabindex="-1" role="dialog" aria-labelledby="exampleModalLabel">
<div class="modal-dialog" role="document">
<div class="modal-content">
<div class="modal-header">
<button type="button" class="close" data-dismiss="modal" aria-label="Close"><span aria-hidden="true">&times;</span></button>
<h4 class="modal-title" id="exampleModalLabel">Add machine info</h4>
</div>
<div class="modal-body">
<form>
<div class="form-group">
<label for="txtDevice" class="control-label">Device Name:</label>
<input type="text" class="form-control" ng-model="info.device" id="txtDevice">
</div>
<div class="form-group">
<label for="txtIP" class="control-label">IP Address:</label>
<input type="text" class="form-control" ng-model="info.ip" id="txtIP">
</div>
<div class="form-group">
<label for="txtUsername" class="control-label">Username:</label>
<input type="text" class="form-control" ng-model="info.username" id="txtUsername">
</div>
<div class="form-group">
<label for="txtPassword" class="control-label">Password:</label>
<input type="text" class="form-control" ng-model="info.password" id="txtPassword">
</div>
<div class="form-group">
<label for="txtPort" class="control-label">Port:</label>
<input type="text" class="form-control" ng-model="info.port" id="txtPort">
</div>
</form>
</div>
<div class="modal-footer">
<button type="button" class="btn btn-default" data-dismiss="modal">Close</button>
<button ng-show="showAdd" id="btnAdd" ng-click="addMachine()" type="button" class="btn btn-primary">Add machine</button>
<button ng-show="!showAdd" id="btnAdd" ng-click="updateMachine()" type="button" class="btn btn-primary">Update</button>
</div>
</div>
</div>
</div>
Also read : How to create a Web App Using Angular 4
Now create an angular js module and controller in the list.html page. Inside we’ll write a function to initiate the insert machine details call. Here is the angularjs code :
angular.module('myApp', [])
    .controller('HomeCtrl', function($scope, $http) {

        $scope.info = {};

        $scope.showAdd = true;

        $scope.addMachine = function() {

            $http({
                method: 'POST',
                url: '/addMachine',
                data: {
                    info: $scope.info
                }
            }).then(function(response) {
                $scope.showlist();
                $('#addPopUp').modal('hide')
                $scope.info = {}
            }, function(error) {
                console.log(error);
            });
        }

    })
We have defined a $scope variable called showAdd to toggle the display of Add and Update button in the app pop up.
Now we need to define the /addMachine method inside the app.py which would insert the records to MongoDb.
in order to interact with MongoDb from Python, we’ll make use of the PyMongo connector.
Install the connector using PIP as shown:
pip install pymongo
Import the PyMongo client inside the app.py file.
from pymongo import MongoClient
Create a client and a database object to access MongoDb collections as shown :
client = MongoClient('localhost:27017')
db = client.MachineData
Now we’ll use the database object db to insert recorsd to MongoDb. Here is how the /addMachine method would look like:
@application.route("/addMachine",methods=['POST'])
def addMachine():
    try:
        json_data = request.json['info']
        deviceName = json_data['device']
        ipAddress = json_data['ip']
        userName = json_data['username']
        password = json_data['password']
        portNumber = json_data['port']

        db.Machines.insert_one({
            'device':deviceName,'ip':ipAddress,'username':userName,'password':password,'port':portNumber
            })
        return jsonify(status='OK',message='inserted successfully')

    except Exception,e:
        return jsonify(status='ERROR',message=str(e))
In the above method we have used request to read json data. Once the data has been read we have inserted the data using the insert_one API call. Save the changes and try running your program and on clicking the Add button you should be able to enter the details and save the data.
Fetching All Machine Details
Once the details have been inserted into MongoDB, we need to fetch all details inserted and display on the listing page. So, define python method called getMachineList which would fetch all the details from MongoDb using the find() API. Here is how the python method would look like:
@application.route("/getMachineList",methods=['POST'])
def getMachineList():
    try:
        machines = db.Machines.find()

        machineList = []
        for machine in machines:
            print machine
            machineItem = {
                    'device':machine['device'],
                    'ip':machine['ip'],
                    'username':machine['username'],
                    'password':machine['password'],
                    'port':machine['port'],
                    'id': str(machine['_id'])
                    }
            machineList.append(machineItem)
    except Exception,e:
        return str(e)
    return json.dumps(machineList)
Define a method called showList in the AngularJS controller to make a call to the python method to fetch the details and assign the details in a scope variable.
$scope.showlist = function() {
    $http({
        method: 'POST',
        url: '/getMachineList',

    }).then(function(response) {
        $scope.machines = response.data;
        console.log('mm', $scope.machines);
    }, function(error) {
        console.log(error);
    });
}
Also, make a call to the showList method in the angularjs controller, so that it fetches the data on page load itself.
$scope.showList()
Modify the HTML code to iterate the $scope.machines data using ngRepeat.
<tr ng-repeat="machine in machines track by $index">
<th scope="row">
    {{'{{$index+1}}'}}
</th>
<td>
    {{ '{{machine.device}}' }}
</td>
<td>
    {{ '{{machine.ip}}' }}
</td>
<td>
    {{'{{machine.username}}'}}
</td>
<td>
    {{'{{machine.password}}'}}
</td>
<td>
    {{'{{machine.port}}'}}
</td>
<td><span style="cursor:pointer;" ng-click="editMachine(machine.id)" class="glyphicon glyphicon-pencil" aria-hidden="true"></span></td>
<td><span style="cursor:pointer;color:#e43309;" ng-click="confirmDelete(machine.id)" class="glyphicon glyphicon-remove" aria-hidden="true"></span></td>
<td><span style="cursor:pointer;color:#3c763d;" ng-click="showRunPopUp(machine.id)" class="glyphicon glyphicon-play" aria-hidden="true"></span></td>
</tr>
You might have noticed that I have used double braces outside the AngularJS double braces. Answer to why AngularJS double braces doesn’t work in Python Flask can be found here.
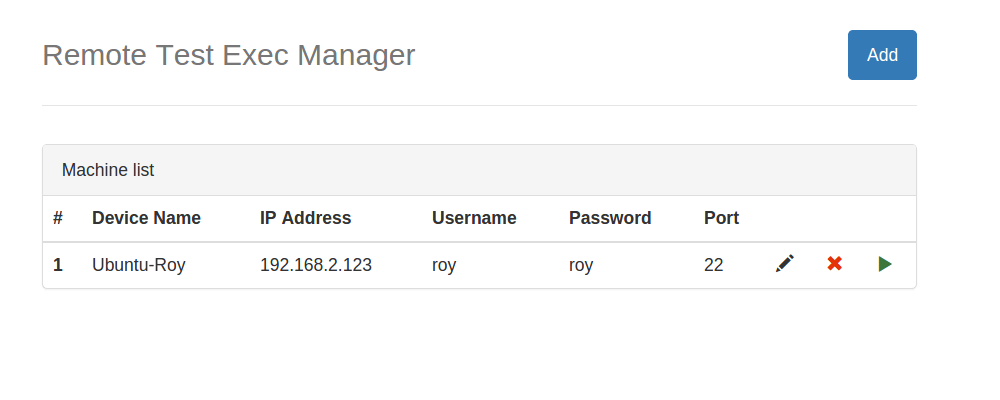
Save the above changes and try running the app. Click on the Add button and you should be able add the details and the added details should be listed in the list page.
Update & Delete Machine Details
Quite similar to how we inserted and read the machine details, we’ll implement the updation and deletion process. All we need to do is create a python method for delete and update. In both cases we’ll pass in the id to be updated or deleted. Here is the updateMachine python method:
@application.route('/updateMachine',methods=['POST'])
def updateMachine():
    try:
        machineInfo = request.json['info']
        machineId = machineInfo['id']
        device = machineInfo['device']
        ip = machineInfo['ip']
        username = machineInfo['username']
        password = machineInfo['password']
        port = machineInfo['port']

        db.Machines.update_one({'_id':ObjectId(machineId)},{'$set':{'device':device,'ip':ip,'username':username,'password':password,'port':port}})
        return jsonify(status='OK',message='updated successfully')
    except Exception, e:
        return jsonify(status='ERROR',message=str(e))
Here is the deleteMachine method:
@application.route("/deleteMachine",methods=['POST'])
def deleteMachine():
    try:
        machineId = request.json['id']
        db.Machines.remove({'_id':ObjectId(machineId)})
        return jsonify(status='OK',message='deletion successful')
    except Exception, e:
        return jsonify(status='ERROR',message=str(e))
Executing Remote Script Using Python Fabric
Fabric helps in executing script in a remote desktop environment. In order to get started, you need to install fabric using pip.
pip install fabric
Once fabric has been installed import it in our app.py.
from fabric.api import *
Create a python method called execute which would read the command to be executed and execute it. Inside the execute method we need to set the host_string and password and you should be able to run the commands on remote machines. Here is the execute python method:
@application.route("/execute",methods=['POST'])
def execute():
    try:
        machineInfo = request.json['info']
        ip = machineInfo['ip']
        username = machineInfo['username']
        password = machineInfo['password']
        command = machineInfo['command']
        isRoot = machineInfo['isRoot']

        env.host_string = username + '@' + ip
        env.password = password
        resp = ''
        with settings(warn_only=True):
            if isRoot:
                resp = sudo(command)
            else:
                resp = run(command)

        return jsonify(status='OK',message=resp)
    except Exception, e:
        print 'Error is ' + str(e)
        return jsonify(status='ERROR',message=str(e))
Fabric provides an option to run the commands as normal user and as super users. To run the command as super user we make a call to sudo command, otherwise we use the run command.
Wrapping It Up
In this part of the tutorial, we saw how to get started with Creating a Web App Using Python Flask, AngularJS & MongoDB. We implemented the basic CRUD operations on MongoDB from Python using the PyMongo connector. We also implemented the remote script execution functionality using the Python Fabric library.
Do let us know your thoughts, suggestions or any corrections in the comments below.
Also read : Creating an AngularJS App Powered By Python Flask RESTful API