In this tutorial, you’ll learn how to implement auto complete in Angular 4 web application. You’ll be using Angular material for implementing the auto complete functionality.
Other tutorials in Angular tutorial series.
- How To Make Asynchronous Calls In Angular
- How to Implement Auto Complete In Angular
- Creating A Web App Using Angular And MongoDB
- How To Create A Web App Using Angular And Firebase
- How To Make Login Page Using Angular And Firebase
Getting Started With Angular Application
If you are new to Angular web application development, I would recommend you first try creating a simple web app using Angular 4.
Let’s get started by creating a new Angular 4 app using the Angular CLI.
ng new AngularAuto
Navigate to the project directory and install the required dependencies.
cd AngularAuto
npm install
Once you have installed all the dependencies, start the server using the following command:
ng serve
You should have the starter Angular app running at http://localhost:4200/.
Adding Angular Material Dependencies
You’ll be using the Angular Material auto complete component in the Angular application. So, let’s start by installing Angular material in the application.
npm install --save @angular/material @angular/cdk
Also install Angular animations since some components require Angular animations.
npm install --save @angular/animations
Import the BrowserAnimationsModule in the app.module.ts file. You’ll also need ReactiveFormsModule and the MatAutocompleteModule since you’ll be implementing auto complete component. Here is how the app.module.ts file would look:
import { BrowserModule } from '@angular/platform-browser';
import { NgModule } from '@angular/core';
import { HttpModule } from '@angular/http';
import { BrowserAnimationsModule } from '@angular/platform-browser/animations';
import { FormsModule, ReactiveFormsModule } from '@angular/forms';
import { MatAutocompleteModule, MatInputModule } from '@angular/material';

import { AppComponent } from './app.component';

@NgModule({
  declarations: [
    AppComponent
  ],
  imports: [
    BrowserModule,
    MatInputModule,
    ReactiveFormsModule,
    MatAutocompleteModule,
    BrowserAnimationsModule,
    FormsModule,
    HttpModule
  ],
  providers: [],
  bootstrap: [AppComponent]
})
export class AppModule { }
You have also imported the MatInputModule along with the MatAutocompleteModule module.
Adding the Angular Material Auto Complete
Add the following code to the app.component.html file.
<form class="example-form">
  <mat-form-field class="example-full-width">
    <input type="text" placeholder="search word" aria-label="Number" matInput [formControl]="searchTerm" [matAutocomplete]="auto">
    <mat-autocomplete #auto="matAutocomplete">
      <mat-option *ngFor="let item of searchResult" [value]="item">

      </mat-option>
    </mat-autocomplete>
  </mat-form-field>
</form>
As you can see above, you have added the search input for searching and the Angular Material auto complete control using the tag mat-autocomplete.
You have added the formControl directive to the input search box. You have set the searchResult to the mat-option tag which would display the search result.
Implementing Auto Complete In Angular 4
Using the form control valueChanges property you’ll check for when the user types in the search word. Whenever the search term is entered you’ll fire the API call to get the search result and display it in the auto complete list.
Let’s get started by writing an Angular service for making the API call. You’ll be using an online API to get synonyms for the search term. You’ll make use of the Angular HTTP module to make the REST API call. Here is how the Angular service looks like:
import { Injectable } from '@angular/core';
import { Http } from '@angular/http';

@Injectable()
export class AppService {

    url: string
    constructor(private http : Http){
        this.url  = 'https://api.datamuse.com/words?ml='
    }

    search_word(term){
        return this.http.get(this.url + term).map(res => {
            return res.json().map(item => {
                return item.word
            })
        })
    }
}
The above service returns the search result using the method search_word.
Subscribe to the above service in the app.component.ts constructor whenever the searchTerm’s value changes. Here is how it looks:
this.searchTerm.valueChanges
        .subscribe(data => {
            this.service.search_word(data).subscribe(response =>{
                this.searchResult = response
            })
        })
The problem with the above code is that it would fire on typing each letter even without the user completing the search term which would be bad. So, it fix that issue you’ll be using the debouceTime. What debouceTime does is wait for a specified time before making the service call. Here is the complete app.component.ts file looks:
import { Component } from '@angular/core';
import { FormControl } from '@angular/forms';
import { AppService } from './app.service'
import 'rxjs/add/operator/debounceTime';
import 'rxjs/add/operator/map';

@Component({
  selector: 'app-root',
  templateUrl: './app.component.html',
  styleUrls: ['./app.component.css'],
  providers: [AppService]
})
export class AppComponent {

  searchTerm : FormControl = new FormControl();

  searchResult = [];

  constructor(private service: AppService){
    this.searchTerm.valueChanges
        .debounceTime(400)
        .subscribe(data => {
            this.service.search_word(data).subscribe(response =>{
                this.searchResult = response
            })
        })
  }
}
Save the above changes and you should have your working Auto complete in Angular.
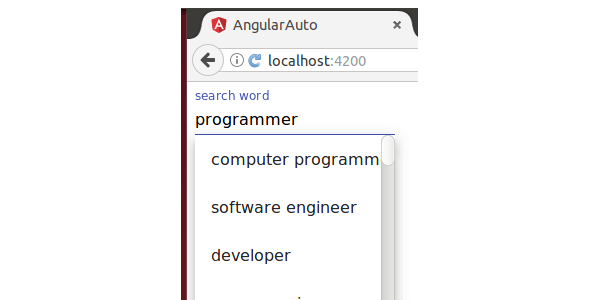
Wrapping It Up
In this tutorial, you learnt how to implement auto complete in Angular 4. You saw how to prevent server call on each letter press using the debouceTime method.
Do let us know your thoughts and suggestions in the comments below.
Source code from this tutorial is available on GitHub.