Unit testing is an important part developing web applications. In this tutorial, you’ll learn how to unit test Express route. You’ll start by creating a Express web app and defining a route which renders a web page with some parameters.
Getting Started With Express App
Let’ get started by creating a folder called NodeApp. Navigate to the project directory and initialize a Node project.
mkdir NodeApp
cd NodeApp
npm init
Enter the project details and you will have the package.json file created in the project directory.
Install the express framework using the Node Package Manager (npm).
# install express framework
npm install express --save
Create a file called app.js and add the following code:
const express = require('express')
const app = express()

app.get('/', (req, res) => {
    res.send('Welcome to CodeHandbook')
});

app.listen(3000, () => console.log('Application listening on port 3000!'))
module.exports = app
Save the above changes and start the Node application.
# start the node app
node app.js
Point your browser to http://localhost:3000/ and you will have the welcome message displayed.
Rendering EJS Template From Express Route
You’ll be using a Embedded JavaScript Templating (EJS) for rendering the views in the express app. Let’s get started by installing the EJS to our express application:
# installing ejs
npm install ejs --save
Once you have installed ejs, set the app view engine as ejs.
/* set the express app view engine*/
app.set('view engine', 'ejs');
Let’s create an express route called /home which will render a home.ejs template.
app.get('/home', (req, res) => {
    res.render('home.ejs',{
        message : 'Welcome Home Dude !!'
    })
})
As seen in the above code, you are passing a message variable to the home.ejs template. The message will be displayed when the home.ejs file is rendered
Create a folder views in the root level of the express app. Inside the views folder, create a file called home.ejs. Add the following code to home.ejs file:
<html>
<head>

</head>
<body>
    <div>
        <p>
            <%= message %>
        </p>
    </div>
</body>
</html>
Save the above changes and restart the express app server. Point your browser to http://localhost:3000/home and you will have the message rendered on the screen.
Unit Test Express Route
Let’s get started with unit testing the /home route that you just created. You’ll be making use of Mocha, a JavaScript test framework to unit test express routes.
Install Mocha using npm.
# install mocha
npm install --save-dev mocha
For testing HTTP calls you’ll be making use of a Node module called SuperTest. Install the module using npm.
# install SuperTest
npm install supertest --save-dev
You’ll be using Chai for asserting the result. Install Chai using npm.
# install chai using npm
npm install chai --save-dev
Once done with all the installations, create a folder called test in the root of the express app. Inside the test folder create a file called home.test.js for writing the unit test case.
Unit Test Express Route for OK status
Let’ start by importing the require modules in the home.test.js file.
const assert = require('assert');
const expect = require('chai').expect
const request = require('supertest');
const app = require('../app')
Start by describing what you unit test will do generally using describe. Inside describe you can write your test case using it as shown:
describe('Unit testing the /home route', function() {

    it('should return OK status', function() {
      return request(app)
        .get('/home')
        .then(function(response){
            assert.equal(response.status, 200)
        })
    });
});
As seen in the above code, you have imported the app from app.js. You have used the SuperTest module to make the HTTP call to the /home route. Once the response is received, you are asserting if the status of the response is 200.
Unit Test Express Route For Message
Writing the unit test case for checking the response message is quite similar to how you implemented the above test case. Once you have made the HTTP call using the SuperTest module, you can check if the response.text contains the expected message or not. Here is how the test case looks :
it('should return message on rendering', function() {
    return request(app)
        .get('/home')
        .then(function(response){
            expect(response.text).to.contain('Welcome Home Dude !!');
        })
});
Here is how the home.test.js file looks:
const assert = require('assert');
const expect = require('chai').expect
const request = require('supertest');
const app = require('../app')

describe('Unit testing the /home route', function() {

    it('should return OK status', function() {
      return request(app)
        .get('/home')
        .then(function(response){
            assert.equal(response.status, 200)
        })
    });

    it('should return message on rendering', function() {
      return request(app)
        .get('/home')
        .then(function(response){
            expect(response.text).to.contain('Welcome Home Dude !!');
        })
    });

});
Modify the package.json file to include mocha in the test script which will enable us to run test cases by typing npm test.
"scripts": {
    "test": "mocha --exit"
  }
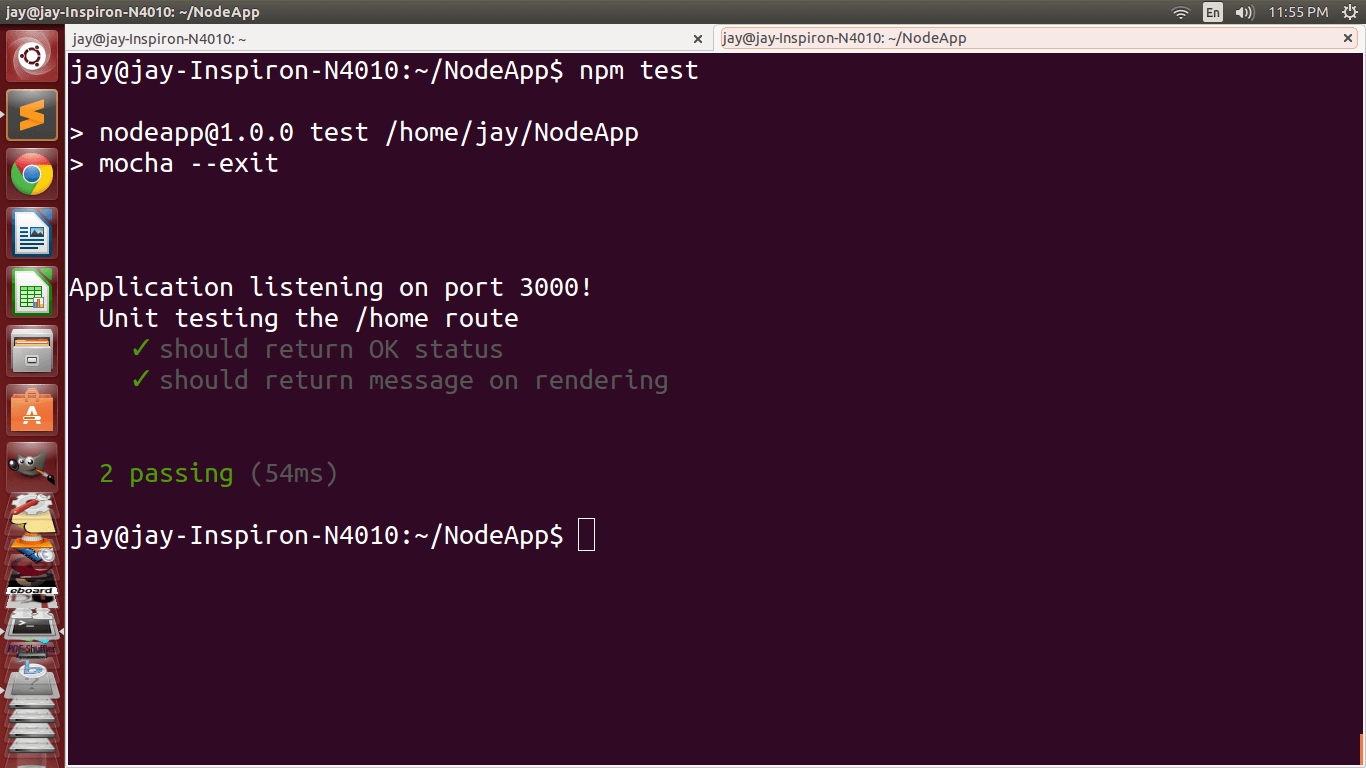
Save the above changes and run the unit test cases.
# command to run the test cases
npm test
You will have the unit test case results in the command prompt.
Final Thoughts
In this tutorial, you learnt how to unit test express route. The route that you dealt in this tutorial was rather simple. In the coming tutorials related to unit testing, you’ll see how to unit test some complex JavaScript code.
Do let us know your thoughts and suggestions in the comments below.