In this tutorial, you’ll learn how to host an Angular web application on Clouding.io cloud server. Before getting started with app development and hosting, let’s learn a bit about Clouding.io.
Clouding.io is a VPS cloud server platform having sufficient years of experience in the industry. They provide powerful, stable and flexible cloud servers with high availability round the clock. They have a distributed storage system based on Solid State Drives.
Following are the features offered by Clouding.io :
- High Availability
- They offer high availability round the clock. They have monitoring systems to monitor server performance and take necessary actions when and where required. You can read detailed information about high availability at Clouding.io.
- 100% Redundant
- They offer 100% redundancy which means anytime a component gets faulty, it doesn’t affect the working of the rest of the components.
- Triple Replica
- Each time data is written to server disk it’s been written to 3 disks simultaneously to make sure data is available always whenever requested. In depth information related to related to triple replica feature can be found in official site.
- Guaranteed Performance
- What you order online is what you have running physical at Clouding.io. They always make sure that you have everything running as fast as possible with low cost. I would recommend reading about the Physical hardware behind Clouding.io.
- Pay For What You Use
- They have hourly billing and you can turn on and off your server when ever required. You only need to pay for what you consume. I recommend reading detailed information about billing at Clouding.io.
Now let’s see how to create and deploy Angular app on Clouding.io.
Setting Up The Angular App
Assuming that you have the Node.js and Angular CLI installed, let create the Angular app with boilerplate code.
ng new nvd3-graph
The above command creates the Angular boilerplate code.
You’ll be creating an Angular web app which shows a bar chart for a particular set of data. You’ll be using ng2-nvd3 library for creating bar charts in Angular web app. Let’s install the component for ng2-nvd3.
npm install ng2-nvd3
Once you have the component installed, you need to add the NvD3Module to AppModule. Here is how the modified app.module.ts file looks :
import { BrowserModule } from '@angular/platform-browser';
import { NgModule } from '@angular/core';

import { AppRoutingModule } from './app-routing.module';
import { AppComponent } from './app.component';
import { NvD3Module } from 'ng2-nvd3';

// d3 and nvd3 should be included somewhere
import 'd3';
import 'nvd3';

@NgModule({
  declarations: [
    AppComponent
  ],
  imports: [
    BrowserModule,
    NvD3Module,
    AppRoutingModule
  ],
  providers: [],
  bootstrap: [AppComponent]
})
export class AppModule { }
Once you have included the NvD3Module module, you need to bind the chart data and chart options to the AppComponent.
Modify the app.component.html file as shown :
<div class="divHeader">
    nvd3 Graph In Angular
</div>
Here is the modified app.component.ts file looks :
 import { Component,OnInit, ViewEncapsulation  } from '@angular/core';
declare let d3: any;

@Component({
  selector: 'app-root',
  templateUrl: './app.component.html',
  styleUrls: ['./app.component.css', '../../node_modules/nvd3/build/nv.d3.css'],
  encapsulation: ViewEncapsulation.None
})
export class AppComponent implements OnInit {

  title = 'nvd3-graph';
  options;
  data;

  ngOnInit() {
    this.options = {
      chart: {
        type: 'discreteBarChart',
        height: 450,
        x: function(d){return d.label;},
        y: function(d){return d.value;},
        showValues: true,
        valueFormat: function(d){
          return d3.format(',.4f')(d);
        },
        duration: 500,
        xAxis: {
          axisLabel: 'X Axis'
        },
        yAxis: {
          axisLabel: 'Y Axis',
          axisLabelDistance: -10
        }
      }
    }
    this.data = [
      {

        values: [
          {
            "label" : "A" ,
            "value" : 29.765957771107
          } ,
          {
            "label" : "B" ,
            "value" : 0
          } ,
          {
            "label" : "C" ,
            "value" : 32.807804682612
          } ,
          {
            "label" : "D" ,
            "value" : 196.45946739256
          } ,
          {
            "label" : "E" ,
            "value" : 0.19434030906893
          } ,
          {
            "label" : "F" ,
            "value" : 98.079782601442
          } ,
          {
            "label" : "G" ,
            "value" : 13.925743130903
          } ,
          {
            "label" : "H" ,
            "value" : 5.1387322875705
          }
        ]
      }
    ];
  }
}
Save the above changes and run the Angular app.
npm start
You will have the Angular app running at http://localhost:4200.
Once you have the Angular app good to be deployed, push your code to GitHub. I have pushed the above code to my GitHub.
Deploying Angular App To Clouding.io
Here is checklist of things which needs to be done in cloud server to deploy the app:
- Creating an Ubuntu server.
- Install Node.js - pre requisite for installing Angular CLI
- Install Git for cloning code from GitHub
- Install Angular CLI for building the app
- Install Nginx server for running the app.
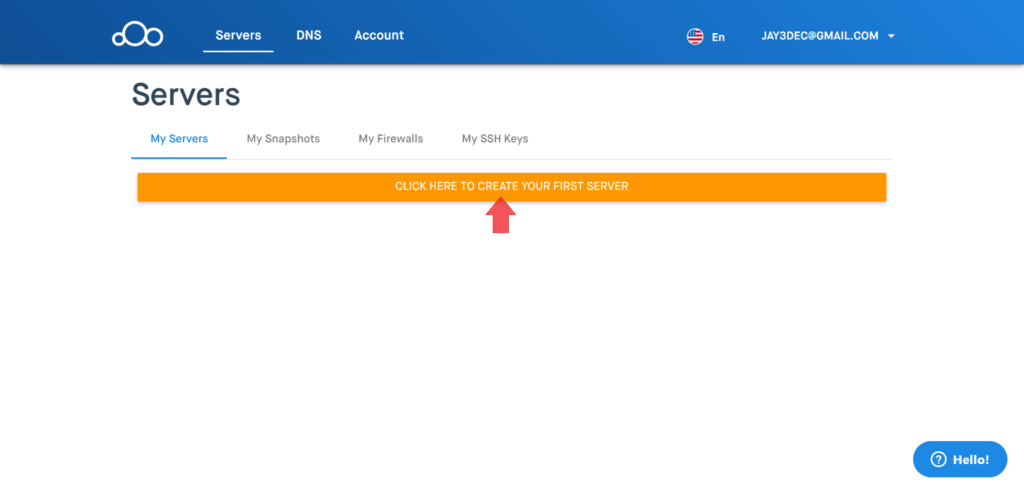
Creating the Server
Login to your Clouding.io server and click on the button to create the server.
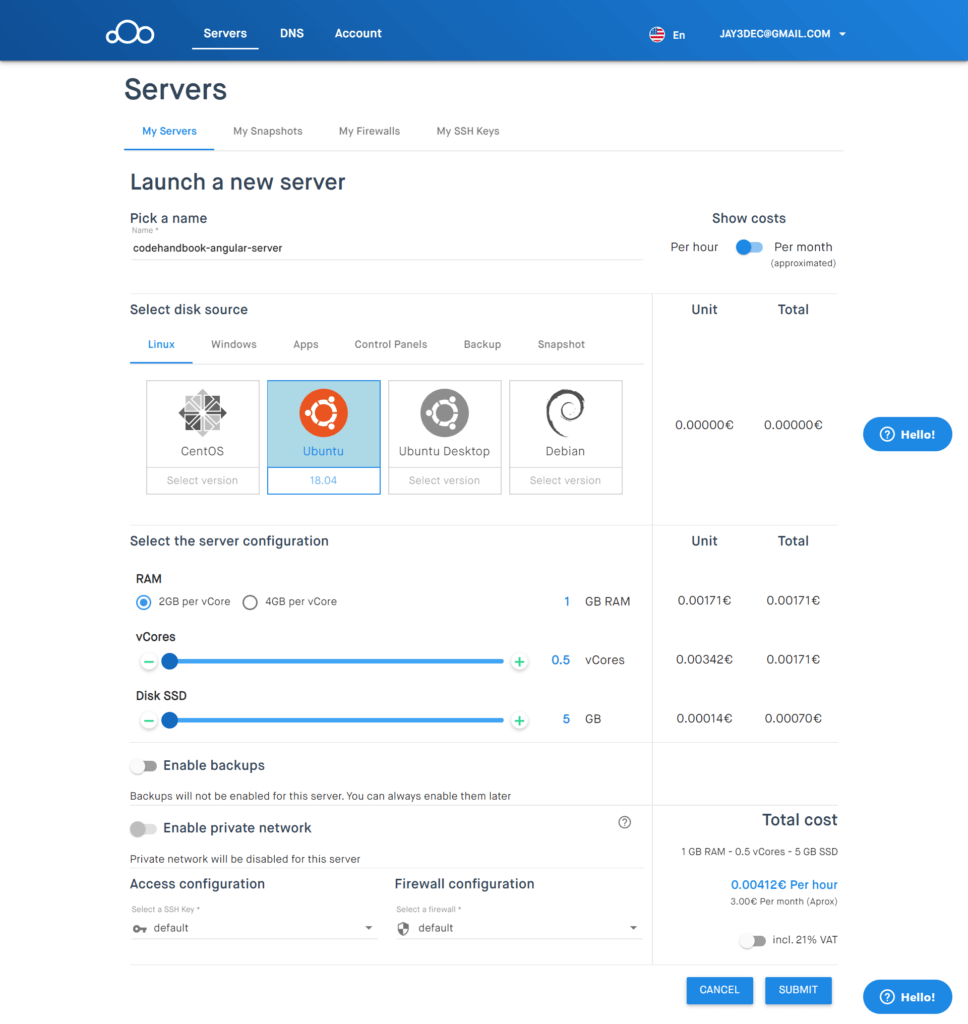
On clicking the button you will be presented with a choice to select disk source. Select Ubuntu and give a name to your server. Leave all the other options as default and click on SUBMIT button.
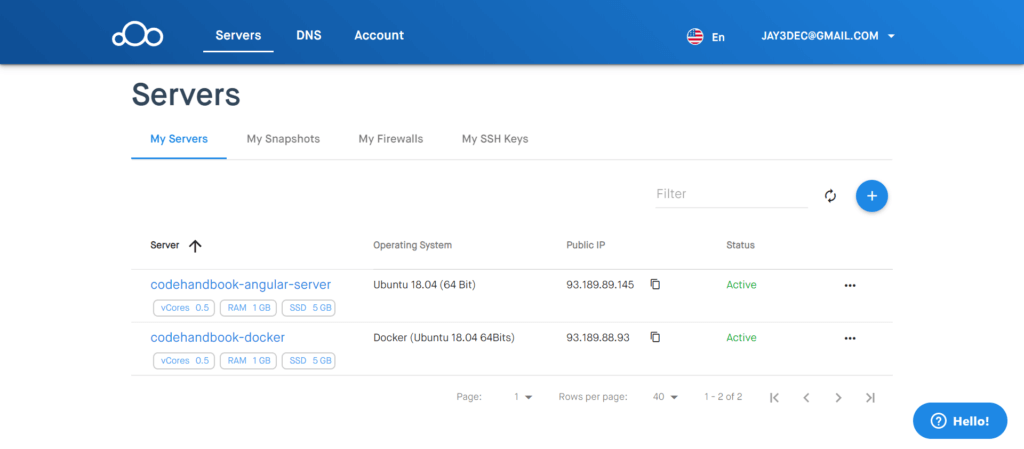
Once the server gets created with the requested configuration, you will have the your server listed in the My Server tab with Active status.
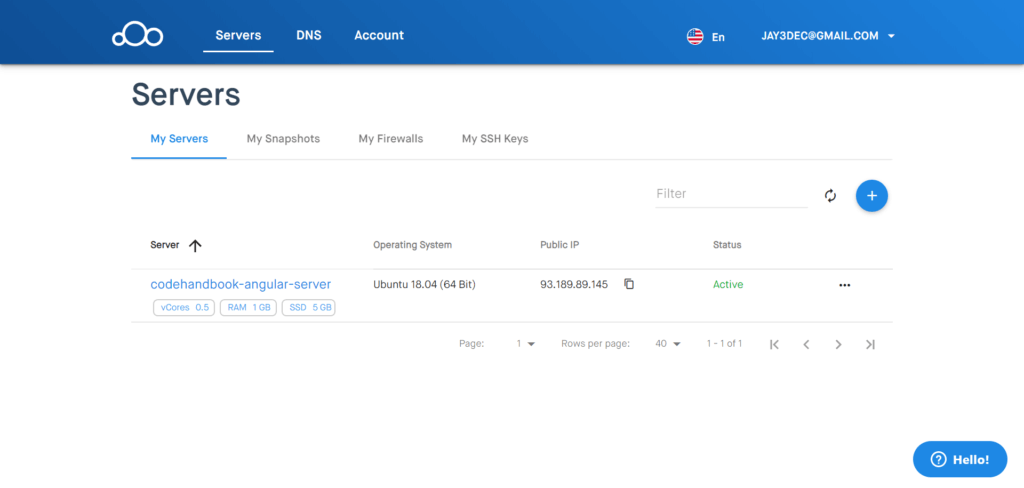
Once the server status turns to active then its ready to use for app deployment. Click on the server name and it will give you a detailed information about the newly created server.
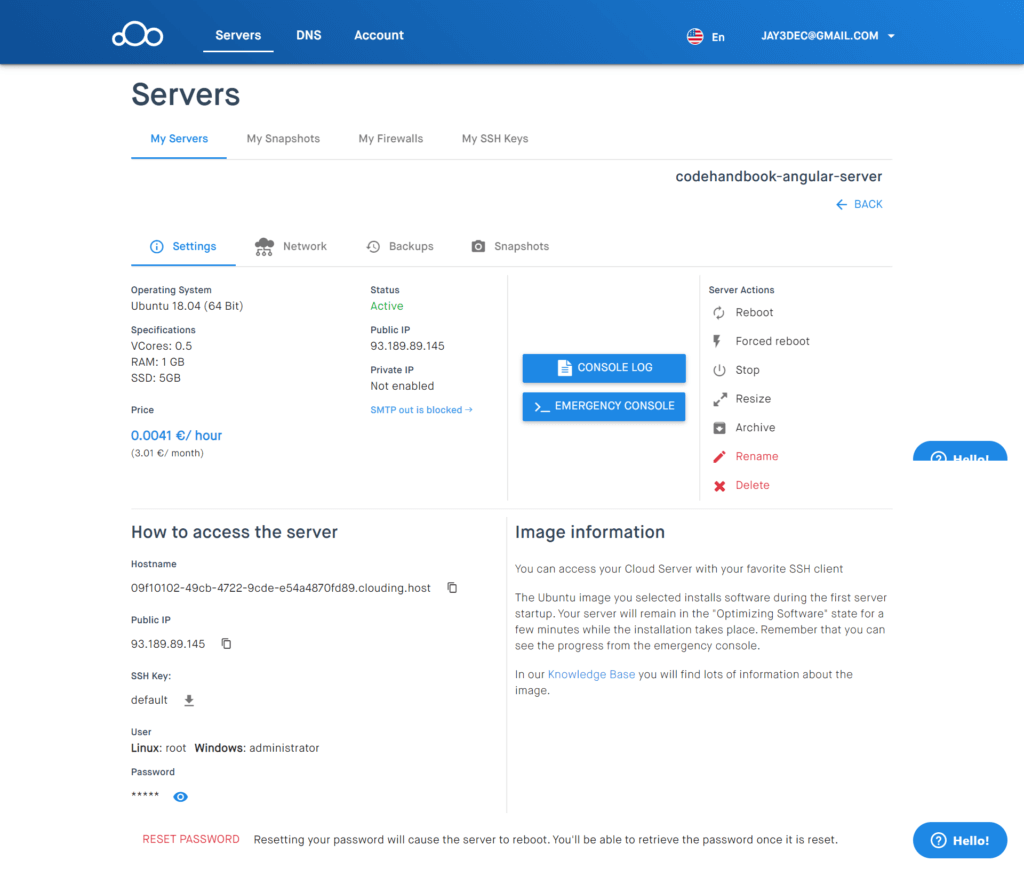
As seen in the above image, under the How to access the server heading you have the required information to access the server.
Remote Login to Clouding.io Server
Using the public IP address, user and password you can login to the cloud server. You can use any ssh client to access the server. I’m using Putty for remote access.
From the ssh client, enter the public IP address to connect to the server. Once connected you’ll be prompted to enter the username and password. Since our server is Ubuntu, the user is root and password is shown in the server details page. Enter the username and password and you’ll be able to access the server.
Once you are in the server command prompt, let’s start by installing Node.js. I’m installing the latest stable version of Node.js.
curl -sL https://deb.nodesource.com/setup_12.x | sudo -E bash -
 sudo apt-get install -y nodejs
Once you have Node.js installed, you can install the Angular CLI using Node Package Manager (npm) which is installed as part of Node.js.
npm install -g @angular/cli
Nginx is web server that you’ll be using to host the Angular app. Let’s install using the following command :
sudo apt-get update
sudo apt-get install nginx
Building & Deploying the Angular App
From the cloud server command prompt, let’s clone the GitHub source code.
root@codehandbook-angular-server:~# git clone https://github.com/jay3dec/nvd3-angular
Navigate to the source code folder and install the required dependencies.
cd nvd3-angular
npm install
Once the dependencies have been installed, build the Angular app using the following command :
ng build --base-href=/nvd3-graph/
The build files will be in the dist folder inside the project folder nvd3-angular. Navigate to the project folder nvd3-angular/dist and copy the build folder nvd3-graph to /var/www/html/.
cd nvd3-angular/dist
cp nvd3-graph -r /var/www/html/
Point your browser to <your-clouding.io-server-public-ip>/nvd3-graph/ and you will have the application running. In my case the application URL is http://93.189.89.145/nvd3-graph/

Deploying Using Docker On Clouding.io
Now let’s have a look at how you can deploy the Angular application on Clouding.io using Docker. To get started, let’s create a new server on Clouding.io.
Name your server and select the disk source as Docker Ubuntu under the Apps tab.
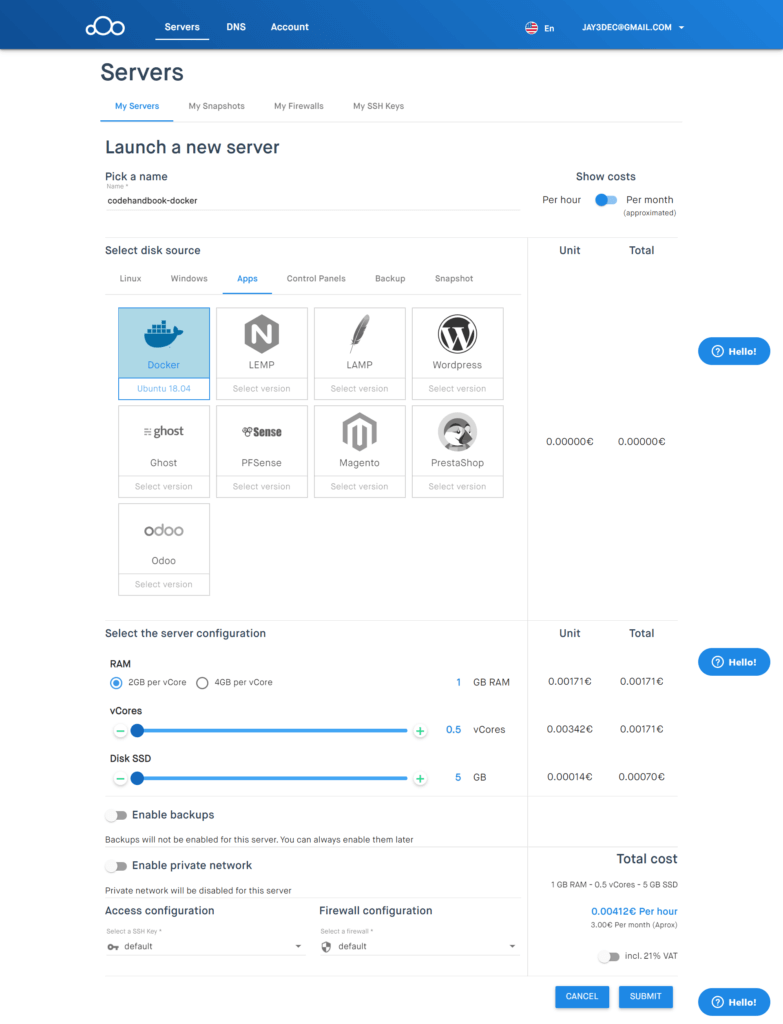
Leaving all other options as default, click on the submit button to create a new server. Once the server is ready it will be listed in the My Servers list.
For deploying any application using Docker containers, the application needs to have a Dockerfile. Inside the Dockerfile there are instructions for creating the Docker image. Once the Docker image is ready you can run it on a container.
Let’s add the Dockerfile to the root of the Angular application source code. Here is how it looks:
### STAGE 1: Build ###
FROM node:12.7-alpine AS build
WORKDIR /usr/src/app
COPY package.json ./
RUN npm install
COPY . .
RUN npm run build
### STAGE 2: Run ###
FROM nginx:1.17.1-alpine
COPY --from=build /usr/src/app/dist/nvd3-graph /usr/share/nginx/html
Add one more file called .dockerignore and add node_modules to it. This is to node_modules folder while copying the data.
I have added the Dockerfile and .dockerignore file to the Angular source code on GitHub. Let’s ssh to the codehandbook-docker server on Clouding.io.
ssh root@ip
Once you login to the remote cloud server, clone the source code using Git.
git clone https://github.com/jay3dec/nvd3-angular
Navigate to the source code folder and create the docker image using the Dockerfile.
docker build -t angularapp .
Once you have the Docker image created, you can run the container using the following command:
docker run -p 80:80 angularapp
Point your browser to the Docker server IP address and you’ll have the Angular application running. You can access my Angular app running at http://93.189.88.93/
Wrapping It Up
In this tutorial, you learnt about Clouding.io, a VPS hosting service. You learnt how to build and deploy an Angular app from the very scratch to the cloud server. You also learnt how to deploy the Angular application using Docker onto Clouding.io.
Getting the app up and running at clouding.io server was quite simple and easy to achieve.
For a detailed information on clouding.io, I would recommend reading through their feature list.